How to Add Additional Custom CSS in WordPress?
Do you know how to add Additional Custom CSS in WordPress?
Have you ever wondered if you could alter the layout design of a WordPress site? Though it has a live customizer and anyone can modify the theme. But certain things are there by default and it can’t be changed.
To solve this issue there is a feature in WordPress called Additional CSS. This feature will let you can add your CSS code inside the theme which will override the original CSS and will make changes accordingly.
So, how are going to do that? Well, in this article I am going to show you to add additional custom CSS in WordPress.
First of all, Log in to your WordPress and open your Dashboard.
Drag the mouse over Appearance and Click on Customize. There it will open a page where you will find a set of tools to customize the site on the left-hand side and on the right-hand side is the live preview of your website.
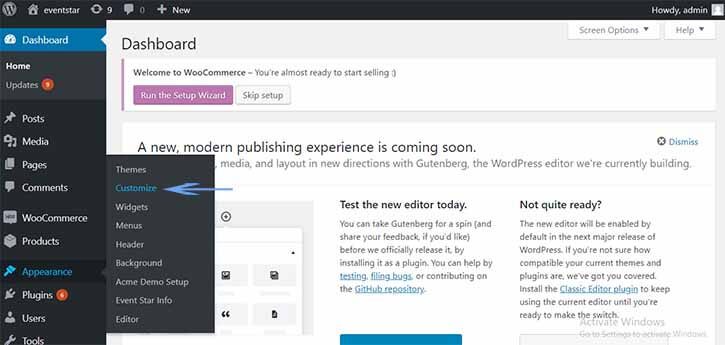
Simply click on Additional CSS which you will find almost at the bottom of the page.
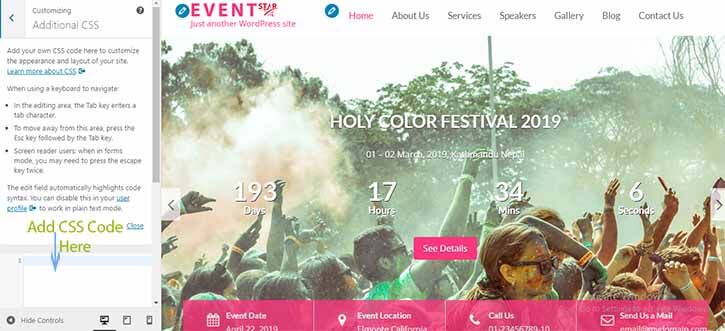
A page will open with an empty box where you can enter the CSS code. As you enter any valid CSS code and simultaneously you will see the changes in the live preview at the right.
If you are not sure about CSS code then it is recommended to learn some basic CSS coding skills.
Here is some important link which will guide you in learning and use CSS to customize a theme.
After finishing writing the CSS code click on the publish button and Save the page.
Note: The CSS code which you have written in the live customizer will only work on a particular theme. If you have any other theme installed in your WordPress then you will need to write the code again or you can simply copy paste the code.
Finally,
We hope that this article will help you in gaining good knowledge about adding CSS to your theme and updating your website`s look.
If you have anything to share with us and write your thoughts in the comment section below:
Last updated for 2026. This article is reviewed annually to keep the information accurate and current. For the most up-to-date WordPress guidance, bookmark this page or subscribe to our newsletter.
I have read your article carefully and I agree with you very much. This has provided a great help for my thesis writing, and I will seriously improve it. However, I don’t know much about a certain place. Can you help me?
Your article gave me a lot of inspiration, I hope you can explain your point of view in more detail, because I have some doubts, thank you.