How to Optimize Images For WordPress? – Image Optimization Guide
According to the HTTP Archive report, images make up on average 21% of a total webpage’s weight. Along with the text, images are the most important elements of a website. Search engines like Google also rate text content with images better than content without images. But, you should definitely deal with the optimization of images on your website as part of the optimization of your website as a whole.
But are you using an image on your website in the right way? or just randomly upload it on your site? You might be missing an important image optimization task. In this article, we are going to explain “Image Optimization for WordPress Website” in detail.
Table of Contents
6 Image Optimization Techniques You Must Follow
1. Rename Your Image Before Upload
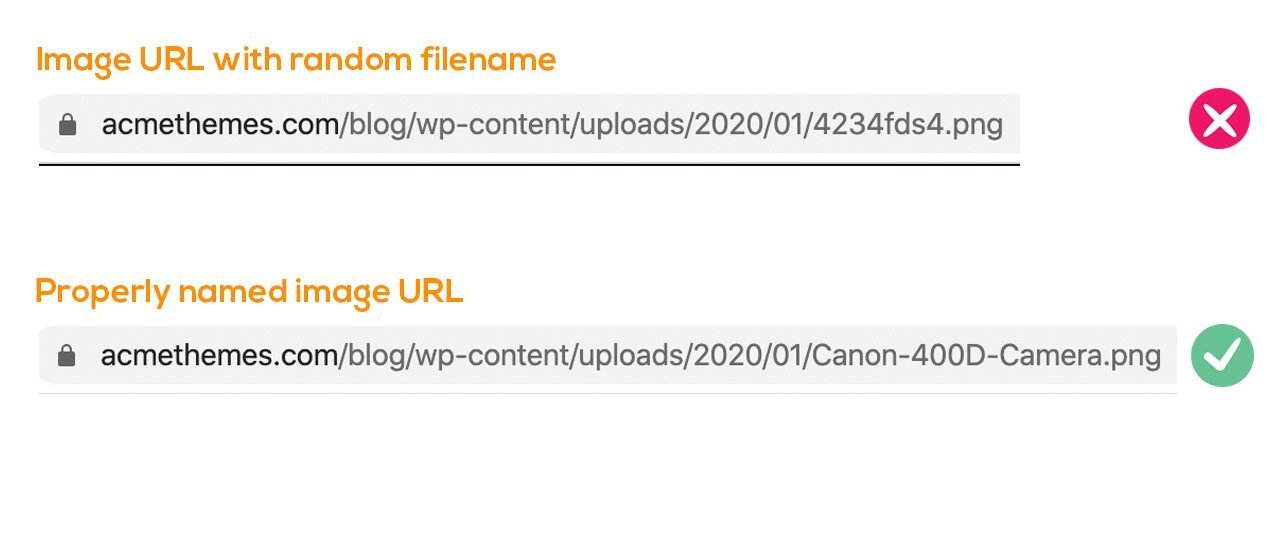
It is always crucial to rename your image before uploading it to the website. Renaming your image file let search engines to recognize the image and place them in the respective category. If you upload your image without a proper name then search engines like Google will not be able to notice it. In the end, your image will be ignored by Google. That is not good for you.
One important thing to notice is when you upload an image without renaming it, it will be stored in the database with the same name as it was. Meaning even though you make changes in the title from “Attachment Details” it will not change. So, from the SEO perspective, it is important to rename your image file with the proper keyword.
For example –
Your image name sometimes like
- IMG_8sd743.jpg
- Screenshot-873403.jpeg
The above image name does not make any sense on the website.
Also, you should be careful about how to properly rename the image so that both users and search engines can understand the image.
Let’s understand the following scenario:

Suppose you have many cameras of different brands and models. And if you rename each of your images as “camera.jpg“, then camera photos will be renamed as “camera-1.jpg“, “camera-2.jpg” and so on.
So, it is better to rename it as a “Canon 400D camera“, this way users and search engines can easily understand what an image is all about.
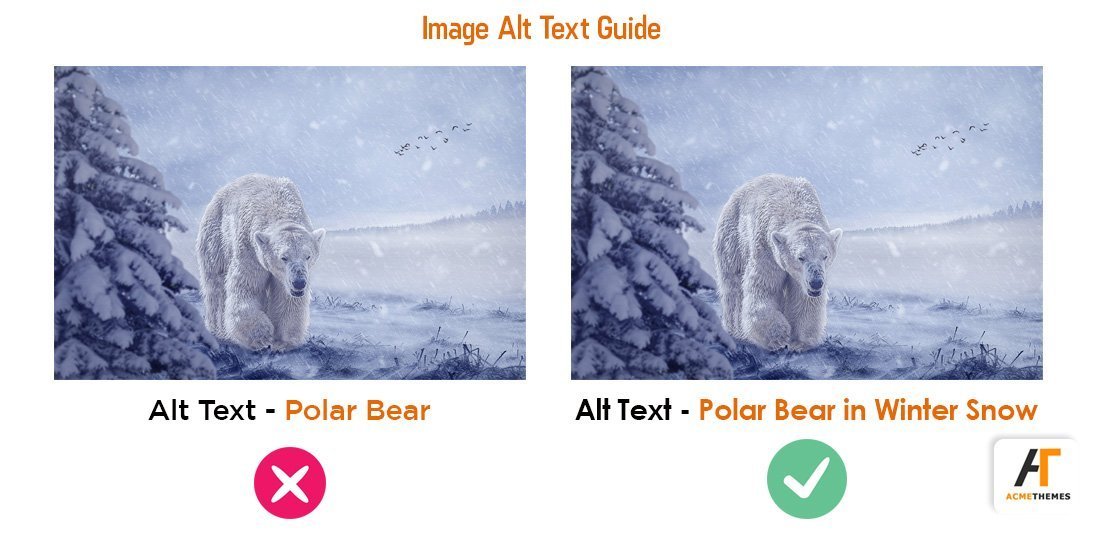
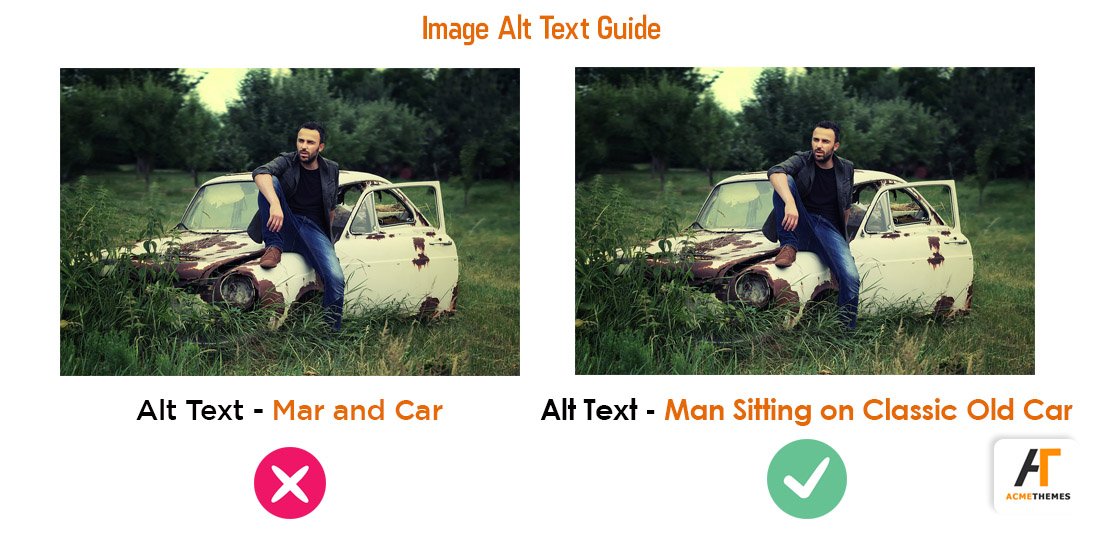
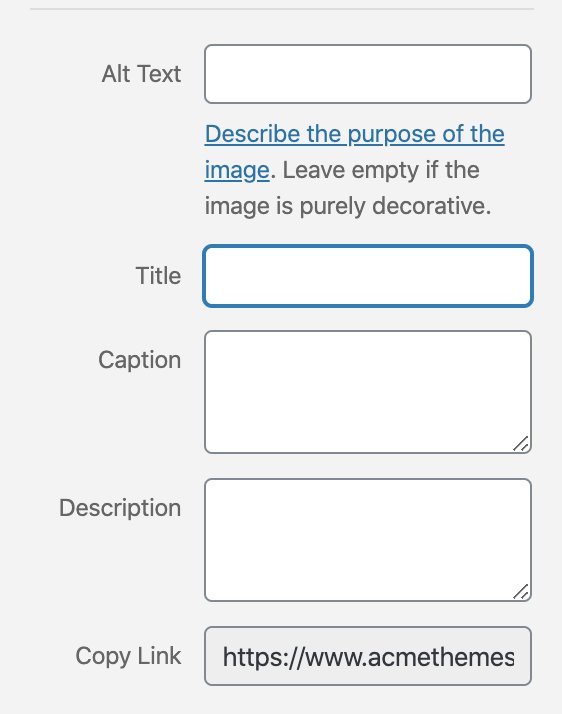
2. Keep Proper Alt Text
Alt text (also called “alt description”, or “alt-tag”) is the written copy that appears in place of an image on a webpage if that particular image fails to load on the screen. So, putting proper alt text is important for accessibility and Image SEO. Try to put the proper image alt tag that better describes the image.
In plain HTML text, Alt Text will look something like this
<img src=”/bear.jpeg” alt=” A polar bear walking on frozen winter” />
Alt text ensures that images can be used by visually impaired people as well. The following image shows how to properly put the alt text for an image.
What About the Caption and Description?
When we talk about Image SEO, captions and Descriptions does not impact on SEO. A caption is an extra information about an image that shows under the image. If you want to describe your image a little more, then you can write in the caption section. A caption and description are different from an “Alt text”, let’s look at the following table.
| Alt Text | Caption | Description |
|---|---|---|
| Important for SEO | Not Important for SEO | Not Important for SEO |
| To explain image | Adds extra information to the image (eg. Sources of image, Image's short description) | Describe image in detail |
| Not visible to users | Visible to users | Visible to users if someone lands on the attachment post page |
| Will be inserted into the code | Not inserted into the code | Description will be stored as post content for the attachment post |
| Compulsory for SEO | Optional | Optional |
3. Keep Your Images Copyright Free
Although you can use images with proper attribution (credit), it is recommended that you have to use copyright-free images in your content. There are many online sources where you can get license-free images. Some of the websites are listed below:
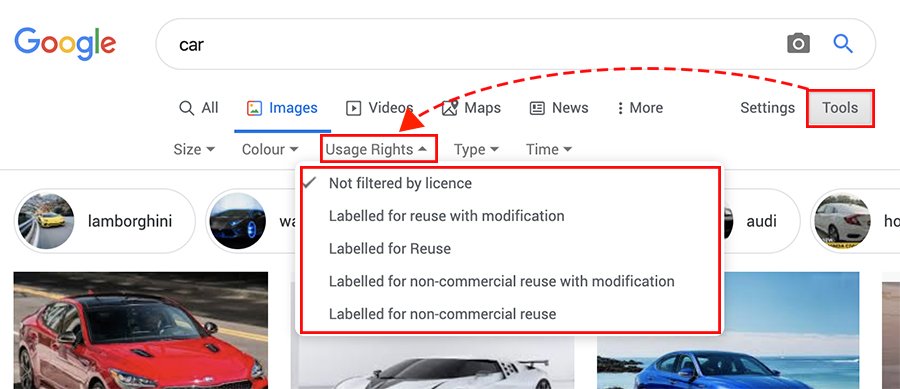
Google Copyright Free Image
Google is the largest website on the planet with billions of images. Google holds billions of images from all the web pages. But all of them are not free to use. You have to filter the images so that you can use those images without attribution.
Just go to Google.com and search for an image. Go to Tools>Usage Rights and here you see the five options. Filter “Labelled for reuse with modification” or “Labelled for reuser” and all the images that show up after this filter can be used in your blog.
Take a look at the following image for reference.
You can use other free stock images from the site like Unsplash.com, Freepik.com, Pixabay.com, and Pexels.com. These are the sites with millions of free stock photos used by millions of people. Some of the photos are premium – meaning you have to pay but most of the images from these sites are free to use.
Check out – 41 Sites to Find Free Images Online
4. Keep the Size of the Image as Small as Possible
You have to optimize your image size so as to make it light. The size of your image has a direct impact on the loading speed of your website. But one thing you should be careful of is while reducing the size of your image, you should also take care of its resolution. If you are not a Photoshop nerd, you can use different tools tinypng.com, tinyjpg.com to reduce the image size. These online FREE TOOLs help you to reduce the size of your image preserving its optimum quality.
Note: It is recommended to keep your image size below 200KB.
5. Chose Proper Image Format
There are mainly three image formats that are in use, JPEG, PNG, and GIF. Let’s look at each of the image formats in detail.
- JPEG (JPG) – JPEG stands for Joint Photographic Experts Group. It is a lossy compressed file format. It is useful for storing photographs in a smaller size. JPG is a common choice for use on the Web because it is compressed. For storing line drawings, text, and iconic graphics at smaller file sizes.
- PNG – PNG stands for Portable Network Graphics. It is a lossless compression file format, this is why it is a common choice for use on the Web. PNG produces better image quality but it occupies a bigger space. PNG is a good choice for storing line drawings, text, and iconic graphics in small file sizes.
- GIF – GIF file is limited to 256 colors and is a lossless compression file format. It is a good choice for presenting an image in an animated form. Use GIF when your graphic uses a relatively low number of colors. GIF or PNG are better choices because they are lossless.
JPEGs are for photographs and realistic images. PNGs are for line art, text-heavy images, and images with few colors. GIFs have just failed.
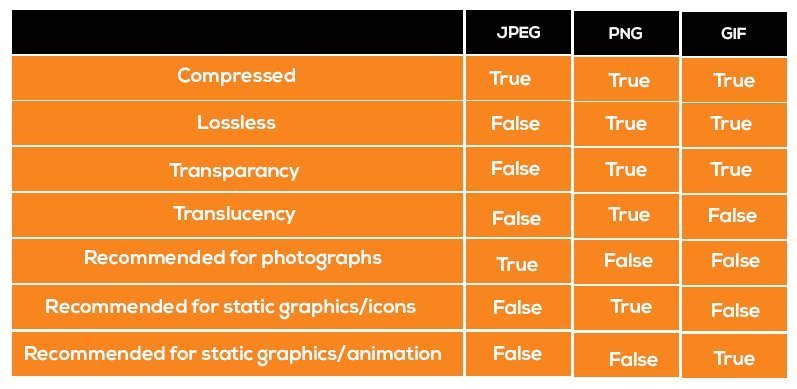
I personally do not recommend GIFs unless there is a “Must Use” situation. Although PNG produces better quality images, it comes in a larger size than JPEG format. So, you have to use the JPEG image in most of the cases in order to save size and quality. However, there might be some cases where PNG produces better results than JPEG.
6. Setup Image Sitemap
A sitemap is important for all website but sitemap is also equally important for the image. It improves your images to be found on the search engines easily.
Image Optimization Plugins For WordPress
For WordPress, there are many image optimizer plugins available, among all, Smush and ShortPixel Image Optimizer is widely used plugins. These plugins do a great job after you upload images, but you have to do lots of things before you even upload the images. This helps in even better image optimization.
Conclusion!
The above 7 tips for optimizing images are manual techniques before uploading them to the website. Whether you use WordPress plugins or not these 7 techniques are must-do actions for you.
So, next time, before you upload the image to your website make sure you follow these steps –
- Rename Your Image Before Upload
- Keep Proper Alt Text
- Keep Your Images Copyright-Free
- Keep the Size of the Image as Small as Possible
- Chose Proper Image Format
- Setup Image Sitemap
Other SEO Articles:
✅WordPress 301 Redirect – Step By Step Guide
✅What is Duplicate Content? How to Avoid it?
If you liked this article, then consider following us on Twitter and Facebook and LinkedIn.
Another very important point on SEO is the optimization and compression of images on the site.
Google yorum satın al hizmeti ile girişiminizi daha çok insana tanıtın